Entering variants | Variants annotations | Importing variants | Exporting & reporting variants


|
Table of Contents
: Managing variants
: Entering variants | Variants annotations | Importing variants | Exporting & reporting variants |

|
Alamut® Visual can import variant annotations from external sources. When variants are successfully imported they are saved as standard Alamut® Visual internal variants and can then be handled like other internal variants.
Alamut® Visual can import variant annotations in cDNA or gDNA coordinates and also in VCF (Variant Calling Format).
In order to import variants into Alamut® Visual you have to prepare a tabular import file containing variant descriptions and annotations. Import files must follow a precise format that is most easily created using a spreadsheet application like Excel or OpenOffice Calc (for cDNA and gDNA), or generated by a dedicated software for VCF.
For cDNA import, the gene specified in the file is supposed to be already loaded within Alamut® Visual.
Here is an example:
| Gene | Transcript | Variant | Pathogenic | Patient ID | Family ID | Phenotype | Comment |
|---|---|---|---|---|---|---|---|
| MSH2 | NM_000251.1 | c.5C>A | unknown | 1 | 123 | Adam+ | |
| MSH2 | NM_000251.1 | c.15_18del | yes | 2 | 456 | ||
| MSH2 | NM_000251.1 | c.1276+4A>C | Class 3 |
The column order must be strictly observed, however only the first 3 columns are mandatory.
The header line (with column labels) is not mandatory. If it is present then columns must be named as in the example above.
Let's review each column contents:
For gDNA import, the process requires to load within Alamut® Visual each gene holding potentially variants from the file and to import it. Only variants in gene locus will be processed.
Here is an example:
| Assembly | Chromosome | Variant | Pathogenic | Patient ID | Family ID | Phenotype | Comment |
|---|---|---|---|---|---|---|---|
| GRCh37 | chr2 | g.47630335C>A | unknown | 1 | 123 | Adam+ | |
| GRCh37 | 2 | g.47630347_47630350del | yes | 2 | 456 | ||
| GRCh37 | chr2 | g.47657084A>C | Class 3 |
The column order must be strictly observed, however only the 3 first columns are mandatory.
The header line (containing column labels) is not mandatory, but it's a good idea to keep it.
Let's review each column contents:
For VCF import, the process requires also to load within Alamut® Visual each gene holding potentially variants from the file and to import it. Only variants in gene locus will be processed.
Standard VCF files can be imported. Fields are #CHROM POS ID REF ALT QUAL FILTER INFO FORMAT
Only CHROM, POS, REF and ALT are used to set up the variant.
ID is also used to set the variant comment.
When variants have been prepared in a spreadsheet application using the format described above, save the data in tab-delimited text format (e.g. in Excel: File > Save As > Save as type: Text (Tab delimited)(*.txt)).
To import variants from an import file as described above, in Alamut® Visual:
As an example, suppose you have prepared a file with gene MSH2 variants.
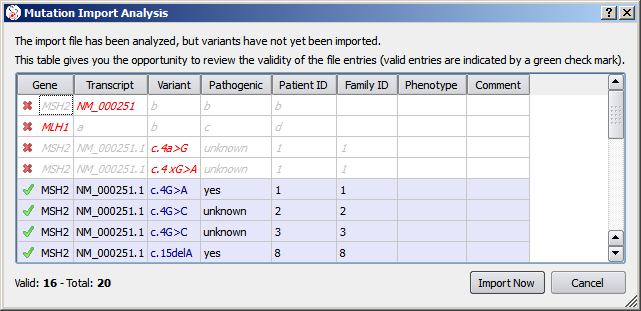
Before actually importing the variants, Alamut® Visual first analyzes the import file and reports valid and invalid entries as follows:

This example for cDNA import is somewhat contrived in order to highlight a few points:
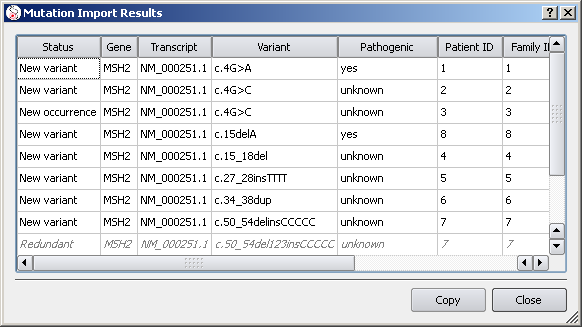
At this step, if you click 'Import Now' the validated entries will actually get imported. A report then shows up:

Note that entries that don't add new information are marked as redundant.
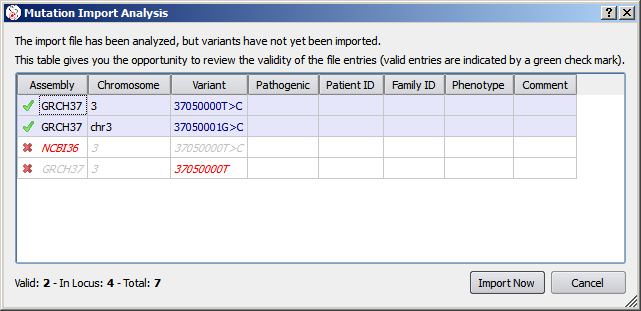
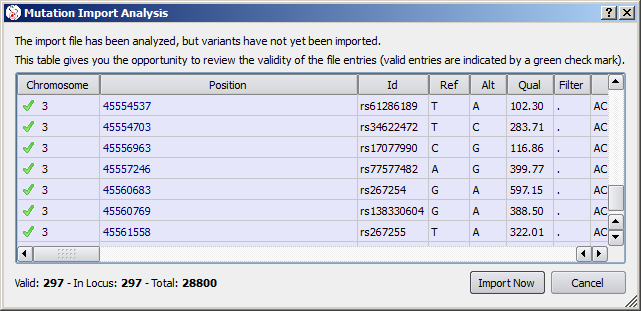
An analogous process exists for gDNA variants and VCF files. In these cases, only variants in locus are viewed in the import analysis (excluding variants on a different chromosome or with a position out of the scope of the current gene).

This example for gDNA import is somewhat contrived in order to highlight a few points:

This example for VCF import shows few variants all matching with dbSNP entries. Only a few hundreds of variants from the file are in the scope of the current gene.
© 2020 Interactive Biosoftware - Last modified: 30 December 2017